Kubernetes cluster installation on Ubuntu can be sometimes very tough if you are new to Kubernetes but can be easy at the same time if you have all the details in one place step by step.
This setup/ tutorial is designed to make your Kubernetes cluster installation journey easy and less time-consuming. Although these steps are more focused on Ubuntu but there is not much difference if you want to install it on another flavor of Linux like RHEL, CentoS or Oracle Linux.
Step 1: Environment
Details of the environment used for this Kubernetes cluster installation setup are mentioned below,
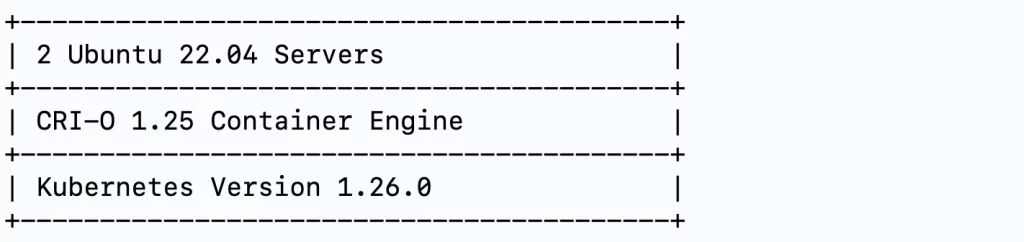
Step 2: Inventory
Following are the server details that were used for the installation of this Kubernetes setup, It can vary for your setup unless you would like to use the same for your lab Kubernetes setup,

Step 3: Name Resolution
In this tutorial, we will make the server name to IP in “/etc/hosts”. You can skip this step if you have proper DNS entries present in your environment. In case you are not sure you can follow this step.
Note: Follow this step in both the master and node servers.
echo "192.168.64.11 k8s-syshunt-master-01.syshunt.com" | sudo tee -a /etc/hosts
echo "192.168.64.12 k8s-syshunt-node-01.syshunt.com" | sudo tee -a /etc/hosts
Step 4: Install Container Engine
We have chosen CRI-O as a container engine, One can choose different based of choice, follow following steps to install CRI-O.
Note: Follow this step in both the master and node servers.
export OS_VERSION_ID=xUbuntu_$(cat /etc/os-release | grep VERSION_ID | awk -F"=" '{print $2}' | tr -d '"')
export CRIO_VERSION=1.25

echo "deb https://download.opensuse.org/repositories/devel:/kubic:/libcontainers:/stable/$OS_VERSION_ID/ /"|sudo tee /etc/apt/sources.list.d/devel:kubic:libcontainers:stable.list
echo "deb http://download.opensuse.org/repositories/devel:/kubic:/libcontainers:/stable:/cri-o:/$CRIO_VERSION/$OS_VERSION_ID/ /"|sudo tee /etc/apt/sources.list.d/devel:kubic:libcontainers:stable:cri-o:$CRIO_VERSION.list

curl -L https://download.opensuse.org/repositories/devel:kubic:libcontainers:stable:cri-o:$CRIO_VERSION/$OS_VERSION_ID/Release.key | sudo apt-key --keyring /etc/apt/trusted.gpg.d/libcontainers.gpg add -
curl -L https://download.opensuse.org/repositories/devel:/kubic:/libcontainers:/stable/$OS_VERSION_ID/Release.key | sudo apt-key --keyring /etc/apt/trusted.gpg.d/libcontainers.gpg add -

sudo apt-get update
sudo apt-get install cri-o cri-o-runc cri-tools -y
sudo systemctl daemon-reload
sudo systemctl enable crio --now
You can check for more details of CRI-O and Installation steps How to install CRI-O in Ubuntu
Step 5: Install the required Kubernetes packages
Note: Follow this step in both the master and node server.
sudo apt-get update
sudo apt-get install -y apt-transport-https ca-certificates curl
sudo curl -fsSLo /etc/apt/keyrings/kubernetes-archive-keyring.gpg https://packages.cloud.google.com/apt/doc/apt-key.gpg
echo "deb [signed-by=/etc/apt/keyrings/kubernetes-archive-keyring.gpg] https://apt.kubernetes.io/ kubernetes-xenial main" | sudo tee /etc/apt/sources.list.d/kubernetes.list
sudo apt-get update
sudo apt-get install -y kubelet kubeadm kubectl
sudo apt-mark hold kubelet kubeadm kubectl
Step 6: Change the required parameters for Networking
Note: Follow this step in both the master and node server.
echo "net.bridge.bridge-nf-call-iptables = 1" | sudo tee -a /etc/sysctl.conf
echo "net.ipv4.ip_forward = 1" | sudo tee -a /etc/sysctl.conf
sudo modprobe br_netfilter
sudo sysctl -p /etc/sysctl.conf
Step 7: Disable Swap
Note: Follow this step in both the master and node server.
sudo swapoff -aDon’t forget to disable swap entry from “/etc/fstab”. For more details on Swap space you can check How to disable swap space Linux
Step 8: Install Kubernetes master components
Note: Follow this step in the master node only.

sudo kubeadm init --apiserver-bind-port 443 --kubernetes-version 1.26.0 --pod-network-cidr 10.11.0.0/16 --service-cidr 10.12.0.0/16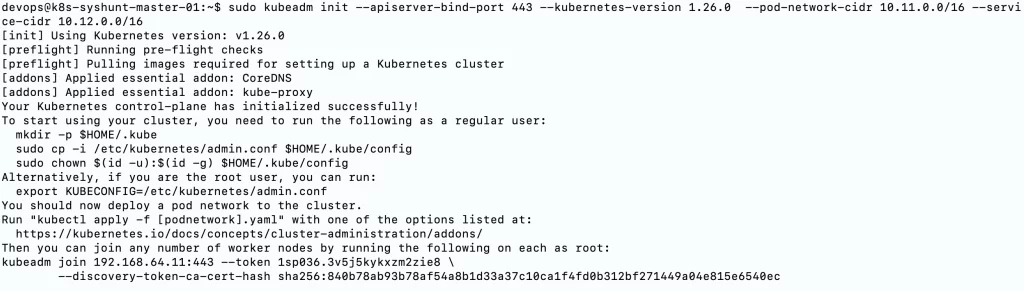
Step 9: Setup Kubeconfig
Note: Follow this step in the master node only.
mkdir -p $HOME/.kube
sudo cp -i /etc/kubernetes/admin.conf $HOME/.kube/config
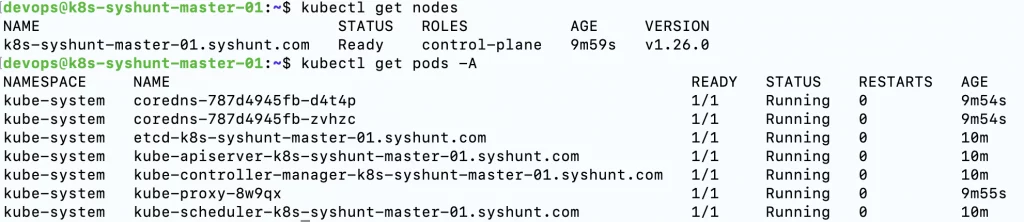
sudo chown $(id -u):$(id -g) $HOME/.kube/configValidate the Node and Pods status
Step 10: Add Kubernetes node into the Cluster
Note: Follow this step in the Worker node only.
sudo kubeadm join 192.168.64.11:443 --token 1sp036.3v5j5kykxzm2zie8 \
        --discovery-token-ca-cert-hash sha256:840b78ab93b78af54a8b1d33a37c10ca1f4fd0b312bf271449a04e815e6540ec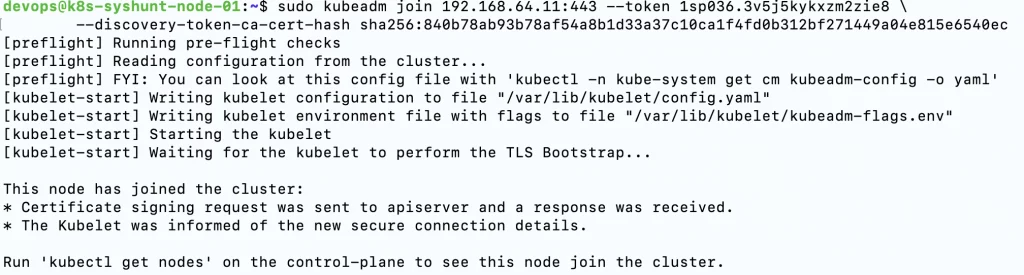

Step 11: Add network Addons to the Kubernetes cluster
There are multiple network Add-ons available for the Kubernetes cluster, We have used the CILIUM network plugin for this Kubernetes cluster Setup but anything else like flannel, canal, etc. also can be used.
Note: Follow this step in the master node only.
CILIUM_CLI_VERSION=$(curl -s https://raw.githubusercontent.com/cilium/cilium-cli/master/stable.txt)
CLI_ARCH=amd64
if [ "$(uname -m)" = "aarch64" ]; then CLI_ARCH=arm64; fi
curl -L --fail --remote-name-all https://github.com/cilium/cilium-cli/releases/download/${CILIUM_CLI_VERSION}/cilium-linux-${CLI_ARCH}.tar.gz
sudo tar xzvfC cilium-linux-${CLI_ARCH}.tar.gz /usr/local/bin
cilium install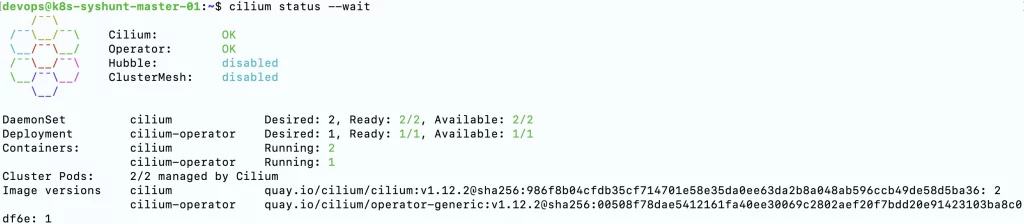
Congrats: We have completed Kubernetes Cluster Installation on Ubuntu. Hope this tutorial was informative and added some value. Please bookmark https://syshunt.com to get preferred results in your google search queries.
Like us on Facebook.


5 thoughts on “Kubernetes 1.26 Installation with Cilium on Ubuntu”